This section will guide you through the procedure required to complete the first-time installation of Cleo LexiCom in the AS/400 Integrated File System.
-
Create the IFS folder.
On a client PC within your Local Area Network that has the Client Access Express for Windows installed and running, use the System i Navigator to create a new folder named LexiCom under the AS/400's Root ('/ ') directory.Warning: You will not be able to run Cleo LexiCom software on the AS/400 if you name this folder anything other than LexiCom!
-
Define the Authorization List for accessing the IFS
Folder.
To allow multiple users to successfully run Cleo LexiCom and share access to all log and host files (even to those who did not originally create the files) without needing to give "All Object" access to any of these users, an Authorization List is used to assign Read, Write and Execute privilege to the /LexiCom folder and all of its subfolders. To do this, choose the Security icon in the System i Navigator, select Authorization Lists and choose New Authorization List.
-
Create a LexiCom Authorization List and select
All under Public
authority.
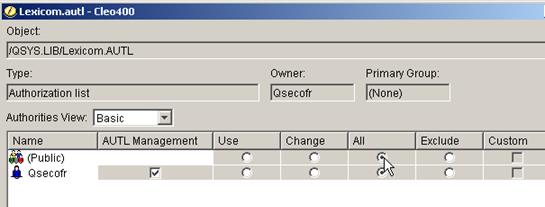
A screen similar to the following will be displayed. Verify that the All privilege is selected.

-
Add the users who will be running Cleo LexiCom
to the Authorization List and assign them the
same All privilege.
Note: The previous steps may also be performed using the CRTAUTL and ADDAUTLE (green screen) commands, if preferred.
-
Next the /LexiCom folder and all its subfolders
must be linked with the newly created Authorization
List. Since the System i Navigator
can only link the /LexiCom folder and none of its
subfolders, it is necessary to open an AS/400 (iSeries/i) green screen
as the owner of the /LexiCom folder or a user with
either *ALLOBJ or *ALL access and
enter the CHGAUT command as follows:
CHGAUT OBJ(‘/LexiCom’) DTAAUT(*RWX) AUTL(LEXICOM) SUBTREE(*ALL)
If desired, the System i Navigator may be used to verify that the Cleo LexiCom Authorization List has been properly assigned to the /LexiCom Object.
To do this, open the File Systems tree and expand the Integrated File System entry. Under the Root entry, right-click the /LexiCom folder and choose Permissions.
For additional information refer to the following IBM resources:
- Authorization lists concepts:
https://www.ibm.com/support/knowledgecenter/en/ssw_ibm_i_73/rzamv/rzamvauthlists.htm
- Authorization list security:
https://www.ibm.com/support/knowledgecenter/en/ssw_ibm_i_71/rzarl/rzarlauthsec.htm
- Authorization lists concepts:
-
Create a LexiCom Authorization List and select
All under Public
authority.
-
Create the Cleo LexiCom File
Share.
Open IBM i Net Server and create a file share for the Cleo LexiCom folder that you created above. Make sure that the file share has Read/Write access.
-
Map the File Share to a Network Drive.
Using Windows Explorer, map the new Cleo LexiCom file share to any available network drive.The contents of the shared IFS drive (which will be empty) should appear.Note: Due to IBM i compatibility issues, Cleo does not guarantee a desirable user experience while using Windows 10 mapped drives to display the LexiCom UI and therefore does not support mapping file shares on Windows 10 network drives.
-
Install Cleo LexiCom to the Network Drive.
Click on the install.exe file that you downloaded from the Cleo website.
Warning: As you are installing Cleo LexiCom, when prompted to Choose Install Folder, do not accept the default value of C:\Program Files\LexiCom. You must either use the network drive (for example, L:\) or the network share (for example, \\cleo400\LexiCom) that you mapped in the previous step as the install target. - At the Install As A Service prompt, make sure the Start service automatically at system startup checkbox is not selected and then click Next. Optionally you can remove the Service name, blanking it out, so that a Windows service will not be created.
-
Register Cleo LexiCom.
Start Cleo LexiCom (from either the Start menu or by double-clicking the LexiCom.exe application in the /LexiCom IFS folder through Windows Explorer) from your PC and register your serial number. See Registering your serial number.Note: Once you have Cleo LexiCom installed into its final production destination, and before the end of your 30-day trial period, request your Permanent License. See Requesting a permanent license.
- When the software registration has completed, verify that the LexiCom.savf file has been copied to the /LexiCom folder on the IFS, then continue to the next section.